Thursday, March 27, 2008

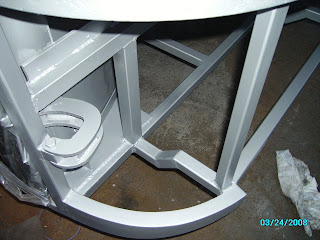
Windsheild header (Rust Bullet)


I still have to put in the corners of the windsheild steel support frame, but after seeing the rerust problems of the winter I thought it was important to get some protection over the steel sooner. This is the 1st coat of three and as I add steel to it I will touch up the Paint. Then I will coat everything 2 more times when I get the steel completed.

Front end (Rust Bullet)

Tuesday, March 25, 2008

Now I need a new bumper...lol.....


I like it...lol.....

Front drivers corner (steel is completed)


I cant tell you how much I want to put some aluminum over it. Since I know it will just catch grinding residue and rust I promise, I will just press on with the steel..lol...

Rust Bullet (bring on the rain)


I spent 2 days getting this floor ready to spray.

Winters rust storm...lol...


This is one of the areas winter caught me on last fall. I got to helping my buddies son finish out his new house and It got to cold to spray any Rust Bullet and this is the results. From here on out I wont move forward untill the area I am working on is coated.

Drivers side bumper support and storage bay floor.


After seeing what the winter did to everything with out the Rust Bullet on it I have decided to not go deeper into the bus with the new steel untill I get some protection on everything.

New bumper support with floor


I have both sides in now and have started to wire brush everything off for the application of Rust Bullet. Man, the winter sure did its number on everything that didnt have paint for protection on it.

Sunday, March 23, 2008

Drivers side wheel well completed


The winter weather kept me from getting the rust bullet on the wheel well but it was not as rusty as I had assumed it would be. Just a little wire brushing and some paint and here it is.

Saturday, March 22, 2008

Drivers side front slide out


I forgot to put up a pic of the wheel well form for the front slide out. Sooo here it is. Allmost a mirror image of the opposite side(this slide out comes farther forward).

Filled in the hole


I seal welded both sides of the repair. That wasnt fun on the backside welding up in that hole between the springs.

Cut out the rusty hole


I squared it off and cut back to some good metal.

Wire brushed the front crossmember


Finally some good metal behind the crud. I checked the rust "hole" out and it seems as though somebody had cut an access hole to get to the air tank between the two front springs and it then just started to rust around the opening.

Rust rear of spare tire support area


Since I am not putting my spare tire here, I am going to make a weather tight compartment here........ Man what am I saying ....... at least the weather is about to break into spring. Pat, I know you gotta be loving this weather too.

Back side of bumper support


Dont it look ugly without the rust bullet ....lol.... I cut of the uppright cause it just had a big bend in it like some dumb but tried to pull this beast by its horns.

Bye bye rusty parts


I've left this part of the bumper support hanging around for moral support as a reminder of how far Ive come. Its time for it to hit the ground with the rest of the rust...lol...

New bumper support on the bus


I'd hate to run into this bus now....

Sunday, March 16, 2008

Filled in the end of the Bumper support corner


After I fit it to the bus and marked the length, I cut it off and filled in the end and sealwelded it. Then I ground it off to finish it off.

Old piece vs new one.


Again, 8 hours latter.

Template check??


Here the swan ...lol.. I checked it to my template and it was spot on. This pic was a time lapse of about 8 hours of time for both corners, start to finish, to get to this point. My how time flys when you are having fun ...lol....

Wire brushed the bumper support.


I sat my ugly duckling egg till it cooled off from the welding and then wire brushed it to find this....lol....

Bumper support all welded up


Ugly duckling waiting to hatch.

Rough out of the replacement steel


First thing was to rough out the parts in new 1/8 inch steel. I pounded out the outside radious on the anvil off to the side of my bench vise. Got it to within a 1/16 of an inch with a lotta light taps. Think I might have woke the neighborhood up though. I did not realize it had gotten to midnight....lol...

Right side up on the lower front corner.


Here it is right side up. This piece is to the right of the front door and under the passenger side bumperette. Heck, I might as well replace them too, as every thing else has been also.

Front lower corners


This is a view of the lower front corner. It is laying upside down on the bench in this pic. You can see it is rusted completly through on the bottom side and what left of the rest of it is very thin.

Sunday, March 9, 2008

Weather, ......argh argh .......


Where is spring!!!!!!!! I noticed when I was loading this pic, the piece of formed metal that I picked up from the sheet metal company the other day. I had it bent to follow the curves of the area between the breast plate and the bumper. WHEN THIS 6 INCHES OF SNOW MELTS?????? I will silka flex it on and update you on it then. I got in a hurry and clamped it to the frame to help hold out the snow and rain during this storm. Aluminumn, finally something on the bus that wont rust when exposed to the elements unprotected by paint or oil.

Gel-coat on the top, of the front cap.


Heres a view of the gel-coat. If you look close in the light glare you can see how it forms an "orange peel" really bad. From my experiance this is normal. It does however block off pretty easy with 600 grit wet paper and polishes up like a new penny in a matter of minutes. I have decided to install the cap before I polish this part of the cap as it will have the tarp hanging over it and I want a little material left there to sand off. Hopefully in a week or so the weather will break and I will get a little siding back on and then install this cap and the new temporary windshields.

Top of the cap


Mother nature hasnt been nice. So I decided to stay inside and finish off the top of the cap with the new white gel-coat. Here I have bondoed in the pits and are ready to finish sand it for the gel prep.