Monday, February 18, 2008
Travel lock end view
Here's a better look at the large "finger" that rotates out after the slideouts are in to lock them in place and pull them tight to the weatherstripping.
Sunday, February 17, 2008
Travel locks for the slideouts
I have been trying to get my hands on a pair of these for about a year now. So when I had the chance to buy a set from a company that supplies them for a motorhome manufacturer I decided to go ahead and get all 4 sets for the slideouts. I have been wanting to get a hold of a pair so I could make my mounting plates to weld into the side of the slideouts. Low and behold these locks are of such high quality that they came with the plates and the wiring harness. Last week was a good one for me. I now have all 4 sets in the basement/parts room. Its starting to look like some kinda warehouse down there. ...lol....
One more angle of the Rust Bullet inside the cap
Rustbullet on the inside of the front cap
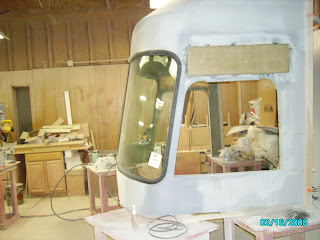
New angle view of windshield
I like the new angle of the windshield. Later, in the flat, right above the windshield I am going to fab a stand off Light bar that will follow the curve of the coach and wrap the sides a bit. It will be about 7 inches tall and have the marker lights and the name of the bus cut into it with some back lighting and then I will send it off to have it chrome plated. I think it will make the front of the coach.
Saturday, February 16, 2008
Abracadabra
One more change on the front cap. arrrrrggggg
Well, originally I was going to cut the new cap off at the bottom to match the height of the 05 but, after carefully measuring I change my mind. Where it is now it comes to the top of the forward drivers side electrical panel opening and I see no reason to cut it off and have to worry about the water finding its way into the panel area again. I had notched the cap at the right side of the door so I would know where to cut it and now I am putting it back on. Just means another day of itching ..... lol .......
Friday, February 15, 2008
Sanding the new side panel
This is the start of the sanding of the new fill-in. The forward part is pretty close and the rear is still lacking. You can see the primer still exsist in the rear of the fill-in because I have not gotten it sanded down to its flat-plain yet. After I am done with the level sanding I will lay on a thin coat of filler (bondo) and sand that completely off to just fill in the pin holes. The pin holes are from small air pockets that cannot be seen with the naked eye to most that open up to the finished layer when you sand them off. Very easy to fill with the Bondo. I have found this to be faster because when you gelcoat over the holes (and gelcoat will fill them) they tend to just creat a small divit through the gelcoat. You see the craziness now???
Thursday, February 14, 2008
Before sanding off
Prepared for grinding the seam on the outside
Behind the form
Resin and cloth
Makeshift form
Gelcoat on the mullion
Inside of the mullion change
Here's a shot of the inside of the mullion. What looks to be holes are not really holes anymore. They are where I had the temporary line ups on the outside to hold the pieces in place as I layed up the inside. After they came off I glassed them in with cloth and resin. Since I am going to spray the inside of this cap with Rust Bullet I saw no need to pigment tint the resin before using it. That, plus the fact that I dont want to see this ugly shade of green inside the bus for the next year or so before I cover it up that is.
Prepping the mullion for gelcoat
Sanding the mullion
Mullion split and filled in
Outside view of mullion
Wednesday, February 13, 2008
windshield center in fiberglass repaired
Sunday, February 10, 2008
Saturday, February 9, 2008
Cloth and resin added
Here's what it looks like with 3 layers of fiberglass cloth and resin on it. After this sets up (about 2 hours in the winter time) I will sand it flush using 120 grit sand paper. The gel coat layer surounding the repair will be my guide lines. Meaning I will sand it down flat just till I reach the layer of gel coat. I will then end up with the surface back to where it used to be.
Grinding through the gel coat
After I grind a v in the back and put on about 3 layers of cloth and resin I pull the line up plates off of the outside and grind through the gel coat and then layer up the outside of the cap. I can then go back to the inside and grind deeper and grind in behind the pop rivet holes and relay everything for strength.
Fiberglass repair
Front cap remodel
Friday, February 8, 2008
Front door to cap fit
Notice the fit at the upper front corner of the door. In the back of my mind when I was laying out the door and welding it up I thought that this wasnt going to work out. So I stopped there and I am glad I did as I need to change the radious of that corner a bit to fit. I will massage the top of the door when the cap is mounted permanently to the bus.
Sunday, February 3, 2008
Window sill fiberglass
I didnt like the way the cap fit the window sill. So while I was at it, Cutting up the cap that is, I just made a couple of relief cuts in it and will glass them in with the changes. It wasnt much of a change as it took no material out other than the width of the blade. That let the back side in 1/4 of an inch though.
Cap
Cap details
I had to split the area where the windshield meets the toll booth window. First I had to cut the whole cap height down for the shorter glass and then I had to size the area to fit 1 and 1/2 steel instead of the 2 for the newer busses. It just meant the whole cap ended up in litteraly 21 pieces. Now the fun comes, making it all one again.
Started assembling the front cap for resizing
Subscribe to:
Posts (Atom)